Tuesday 26 June 2012

28mm Gerbigsjager

Fresh from their recent action in Bohemia, I thought I would put up some pictures of my whole 28mm Gerbigsjager force.

First up, we have the Oberleutnant with his Schirmmütze (peaked cap), along with the groups medic. Both miniatures are Warlord Games plastics, the Medic has been converted to have the captured American supply bag, along with a bit of a repose. The Oberleutnant is straight out of the box, except for his face, which is clearly out of a Commando comic....


Next, we have the first squad of Infantry. All are Warlord Games plastics, with the addition of the metal Gebirgsmütze (field cap) heads from the Warlord range. 1 MG42, as well as the Unterfeldwebel with an MP 40.


The second squad is basically the same as the first, 8 Gerbigsjager, one with MG42. The Unterfeldwebel this time is armed with and STG-44 Assault Rifle. The heads are again the Warlord Games metals, and are just so much better than their normal plastic heads (see the Leutnant if you don't believe me)


The first support unit comes in the form of a sniper team, one spotter, one sniper. The spotter has been taken from the MG42 team, because he was much too cool a model to not have his own base! But also because he had a helmet on, so I decided that to differentiate the sniper team, they would have camo helmets on. The helmet on the plastic sniper figure is from the MG42 pack.


The second support team is a tripod mounted MG42, with three crew. Two crew are metals, with their heads swapped for peaked caps. The third crewman is another plastic Warlord Games soldier with a metal head.


The final support weapon is a simple retaliation to the LVT-2 spotted last week. It is only a matter of time until the Americans arm it with 50 calibre machine guns, so naturally the Germans needed to respond!


The PaK 40 is another Warlord Games model, with the addition of one plastic crewman. It was quite fun to paint actually, but it needs a bit more work put into it's base. I will get around to it at some stage.

So, that's all that is painted for the Germans at the moment, I have a few more things which I will finish up for them sometime in the future.

Friday will be our first test run of 6mm moderns, so much list frothing and rules making has been going on. Oh, and I have been trying to paint a ton of 6mm, so watch that counter keep going up (hopefully).

CP

Monday 25 June 2012

Force on Force- A Scandal in Bohemia

Adam and I managed to get in a game of Force on Force last week, with both of us using forces we decided to hurriedly paint as a bit of a challenge (you might notice a theme with me and painting times). But, it was good. I managed to get painted up... Lieutenant and Medic 2 8 Man Squads 1 3 man MG 42 team 1 2 man Sniper team
The medic, converted from a plastic Warlord Games grenadier. Sculpted the bag, armband and remodeled his arms to make for a more organic pose. It's not perfect, but I like it! Adam had got most of the same finished, but ran out of time to get it all done. So much mocking ensued, despite his claims that his marines' camo made it take longer. I just put it down to good German efficiency! As for the game, we decided to play the Top Malo House scenario from the FoF rules, subbing in Gerbigsjager for the British, and USMC for the Argentinians. We set up a table, showing off some of the lovely countryside of Bohemia, I mean it is historically awful anyway, so why not fight in the Czech countryside?
Another question is why is there an LVT-2 in a landlocked country? The German assault plan was simple, a great big right hook maneuver, while the MG 42 and the sniper fire support squads gave covering fire, hopefully pinning down the enemy! So, first activation, turn one. The sniper fire support team moves forward to the edge of cover, prepares to fire, and rolls a one for a Reaction test. The enemy squad in the building ahead gets first shot, and causes 4 Casualties, on a 4 man squad. I think they know we are here.... So with that resounding failure, it was up to the assault teams to continue to advance... An MG42 gunner observes the suspected enemy positions... With a building providing cover from the enemy firebase, the assaulting squads were able to make good ground up the right flank. The support squads continued to be peppered with enemy fire, both eventually succumbing to the sheer weight of fire against them! But, by this stage, an enemy squad had come forward to counter the big right hook...
Even odds, pity the Germans are D10 and have decided they like rolling 10's! The enemy blocking force was quickly dispatched with a combination of firepower and close assault (learn to love it remember), leaving the assault squad with a relativly clear run into the Top Malo House.
Well there is still 9 of us, how many of you are left? The centre of the board was being held by one solitary MG42 gunner, but he kept up unrelenting bursts of fire into the only enemy squad left, which proved enough to stop them from countering the grand assault into the Top Malo!
Foolish Marines, bringing cover for the Germans! By the end, the Top Malo was cleared, the USMC defeated and the honour of the Bohemians intact. Why the Marines were there? No one knows. Why it was the Gerbigsjager who were sent to oust them? Also unknown. All that is known, is that Force on Force gets more fun the more I play it. What's next? A Gazelle getting hunted by a Crocodile of course....
6mm moderns are a go! More on them, more on the Gerbigsjager and more posting, because I have been slack recently. Back to painting, CP

Friday 15 June 2012

Engagement in the Coral Seas

The French put to sea again, seeking out new and interesting opponents to fight against! This time, they came up against the Austro-Hungarian forces of Than. Rather than using what I had at Southcon, I instead opted for something (as yet) totally unique in Christchurch, I brought no battleships, no dreadnoughts. Instead, I brought two Aircraft Carriers! The full fleet looked like this... Couronne Carrier Couronne Carrier 3 Ecuyer Support Cruisers 3 Frigates 3 Destroyers 3 Epaulard Submarines 3 Frelon Small Flyers 2 Voltaire Interceptors So, the plan was to see just how good Air Power was at sinking enemy fleets! John was running his Dreadnought, the Szent Istvan (spelling is probably wrong), along with 8 destroyers, 3 Pflict blimps and two cruisers. The plan was simple, engage the enemy! My goal was to sink the enemy fleet, saving the Dreadnought for last. The Austro-Hungarians, wary of the incredibly large numbers of the French were in a defensive mindset with the Dreadnought and Cruisers, preferring to send their smaller vessels out to engage and inflict damage on the enemy. Two squadrons of destroyers sallied forth, inflicting serious damage onto the Aircraft Carrier Orleans , which combined with the firepower of the Dreadnought left the carrier one one HP! The life of the destroyers was sadly short lived, the entire French fleet took offense to their large guns and the whole "setting fire to the aircraft carrier" thing, so promptly sent them to the bottom of the ocean. Meanwhile, the Voltaire interceptors on the left flank attempted to screen my waves of tiny Torpedo Bombers by shooting down the enemy Fighters that were screaming ahead to destroy them. However it was not to be for the Interceptors, they themselves came under fire from the enemy Pflict blimps, who, with their Air Hunter Teslacoils made short work of the hapless interceptors. The Ecuyer support cruisers took revenge upon both the tiny tokens and the Pflicts, over successive turns the ships first shot down all of the enemy fighters, then followed that up by downing two Pflict blimps! Sadly, the third blimp was able to board and destroy the Orleans before it too succumbed to the firepower of the Ecuyers. By this time, the enemy fleet was becoming depleted. Long range fire from the Epaulard submarines and the Destroyers began engaging and destroying the enemy cruisers. The final Cruiser fell to the Frelon small flyers, who instigated a carefully calculated bombing run. Once the cruisers were disposed of, all the French firepower was directed upon the enemy Dreadnought. Once a couple of damage points were inflicted (by Frigates no less!). It was time to send in my waves of torpedo bombers. The first wave was defeated by Ack-Ack, the second got through, inflicting a damage point. The third wave came through, inflicting crippling damage to the enemy dreadnoughts systems, the fourth and final wave inflicting further damage onto the isolated vessel. It was at this point, with his Dreadnought with just 3 HP remaining, we agreed to call the game. The French lost both Carriers, but were able to destroy the entire enemy fleet. Two carriers was... Interesting. The French Carrier is tough, but the fleet has no real gunnery ability, very reliant on the Epaulards and Destroyers doing enough damage to the enemy, reliant on the Frelons, Ecuyers and the Voltaires destroying the enemy fighter screens to allow the Tiny Tokens to mass on one enemy target. An interesting fleet, not sure If I am sold on it just yet. Might need a bit more thought. Plenty of things on the painting table, hopefully I might actually get something finished too.... CP

Thursday 7 June 2012

Painting Dystopian Wars French- A How to

I decided to write down an actual guide for how I painted my French fleet for two reasons. Firstly, because I thought someone might actually be interested (certainly if they were copying my camo scheme right Tim?); secondly, and more importantly, because if I don’t, it is likely that I will forget how I actually did it when it comes time to add things to my fleet in the future. At the tournament at the weekend, people were talking about how they weren’t “good” painters, so this guide (I hope) should show people that getting good looking Dystopian ships is not actually that hard!

So, here it is; the Poochie guide to painting French, using a Magenta Battleship as my example.

Step 1

With Dystopian Wars miniatures, it is essential to give them a nice warm, soapy bath. The reason for this is because the mould release agent required to give these super nice resin models doesn’t like paint at all, so it is important to get rid of it before applying spray, otherwise you will get a very shiny, or blotchy result.


Some French ships getting a spruce up

Step 2

Give the model a Black undercoat. I prefer the next to cheapest black spray paint from a local hardware store. Because I am cheap, and it works. Make sure you buy Matt spray however!


Step 3

Undercoat the hull and superstructure of the vessel with Gunship Green (Vallejo 895). This will likely need two coats of paint to get a nice coating, remember it is better to have two thin coats, than one thick coat which would obscure all the pretty details.


Step 4

Add camo stripes of Flat Earth (Vallejo 983). This will serve both as the brown camo, but also as the undercoat for the ochre, so be generous with how much space you give it. Again, two thin coats is better than one thick one here. Try to make nice smooth rounded edges to your camo scheme, think blobby rather than angular with the camo. I find it easiest when I paint the outline of the camo strips, then fill them in.


Step 5

Add the ochre strips, using Green Ochre (Vallejo 914). Use two coats to ensure a nice coating, because you really don’t want bits of green showing up in the middle of your yellow! It is also a pain to go back if you skimp on it at this stage. One key tip here, is to remember the order by which your stripes are painted- I went with Green/Brown/Yellow. You could do Green/Yellow/Brown, it doesn’t really matter, the key thing is to keep the order of the stripes the same the whole way.


Step 6

Paint all of the wooden decking German Camo Medium Brown (Vallejo 826). German Camo Medium Brown is one of my favourite paint colours, so it has to be on every model. Seriously, I haven’t painted a model in a very long time when I didn’t use this colour at least once on it! I think the last thing would be maybe my Germans for FOW? Everything else has this brown somewhere on the model!


Note this pic has a little of the Heat Lance painted, see Step 7

Step 7

This is all about the Heat Lance weapon at the front of the vessel, so skip it if there is not one on it! I layered Fiery Orange (GW Paint), Golden Yellow (GW Paint) and White (Vallejo 951) to give the impression of a very hot set of conductor coils. Key thing here was to make lines of the yellow, then a smaller set of lines of white. Is it the best way of doing it? I am not totally convinced. But it will do, if someone has a better plan, do share it!


The end result on the Heat Lance

Step 8

Paint all of the “Steampunk” (ie not historical) details on the model Brass (Vallejo 801), as well as the smoke stacks. The reason for this is it just helps the details of the model stand out more, and reinforces the slightly fantastical nature of the whole vessel. I chose to paint basically the entire Heat Lance (except the conductor coils) with this brass, to make it look nice and hot!


Step 9

Paint gun barrels, weapon mounts, AA guns, pipes and the tops of smoke stacks with Gunmetal Grey (Vallejo 863). Like the gold, by adding this shiny metal colour it gives a bit of difference to the model, a bit of colour to break up the dull camo scheme. Don’t be too afraid if it is really bright at this point, because the ink will darken and dull the colour.


Step 10

Paint the entire model with Badab Black ink from the Games Workshop range. Now this no longer exists as a paint colour, so I am not sure (yet) what would be an equivalent colour. Be sure to not let the ink pool around any particular area, I always check to make sure that the undersides of turrets etc gets a nice line underneath them, which I do with a small amount of ink on my brush. Give this stage a long time to dry, I use a hot water cylinder cupboard just to be extra sure. If you don’t, you run the risk of serious smudging, or some weird looking pooling of colour.


Step 11

Paint the scroll on the rear of the vessel with Bleached Bone (GW). Again, this will need two coats to get a nice even coat.


Step 12

The final step is to write the name of the vessel onto the freshly painted scroll. This is done by using a black ink pen (not ballpoint- that will not work on the paint), of a smaller nib as possible. Instead of writing them neatly, this time I am using a larger nib (0.4), and smudging the writing after writing it, to give a sort of faded look. A Matt Varnish after the ink has dried dulls it up nicely too.


And with those 12 steps, you should have a completed French vessel! This works for the very small…


The little wee Lyon Class Frigate

Right up to the very large!


The Couronne Class Carrier

One last tip that I learned over the weekend is that the Flying Stands for the Magenta mk 1 and the Marseilles Cruisers are much too tall- for the Cruisers it means that they are incredibly top heavy and topple over, but also it means that your opponents (and yourself) get confused as to their height value etc, so my new decision (as of this morning) is to trim the stands down, to a more manageable height.


No longer flying, just surface skimming

Hopefully that sheds some light on my methods (and madness) in how I paint a Dystopian Wars vessel. I have a few more things left to paint for the fleet that I picked up at Southcon (see Swag photo from my Southcon post), so once I get all that done I will have to put some pictures up of the whole fleet.

Thanks for reading,

CP

Wednesday 6 June 2012

Southcon- Part Two- The main event

So, leading on from yesterdays post, Here is the start of my report for Southcon.

Now, first tip for young players. When planning to do blog posts with pictures, it really, really pays to bring home your camera cable from work, otherwise you will seem like a doofus as your blog post is over a day late!

Anyway, on with the story.

I made the trip down to Dunedin in two stages so was highly relaxed. I did however suffer a fair bit of mocking (perhaps deserved) for deserting the Historical Games for
playing the steam punk ships, but damnit, my Battleship can fly!


After a little bit of a delayed start (and more mocking from my travelling companions), it was time for Game One! Apologies for a lack of photos, the lighting was terrible for my little wee camera, too much light, not enough light, I think I may have given it a serious medical condition!

Game One against Bill with the Covenant of Antarctica

So one of the coolest parts of the weekend for me was that the umpire had created a series of scenarios for each table, and the mission for the first table was to destroy one model chosen from the enemy fleet. Naturally, both Bill and I chose the enemy Battleship!


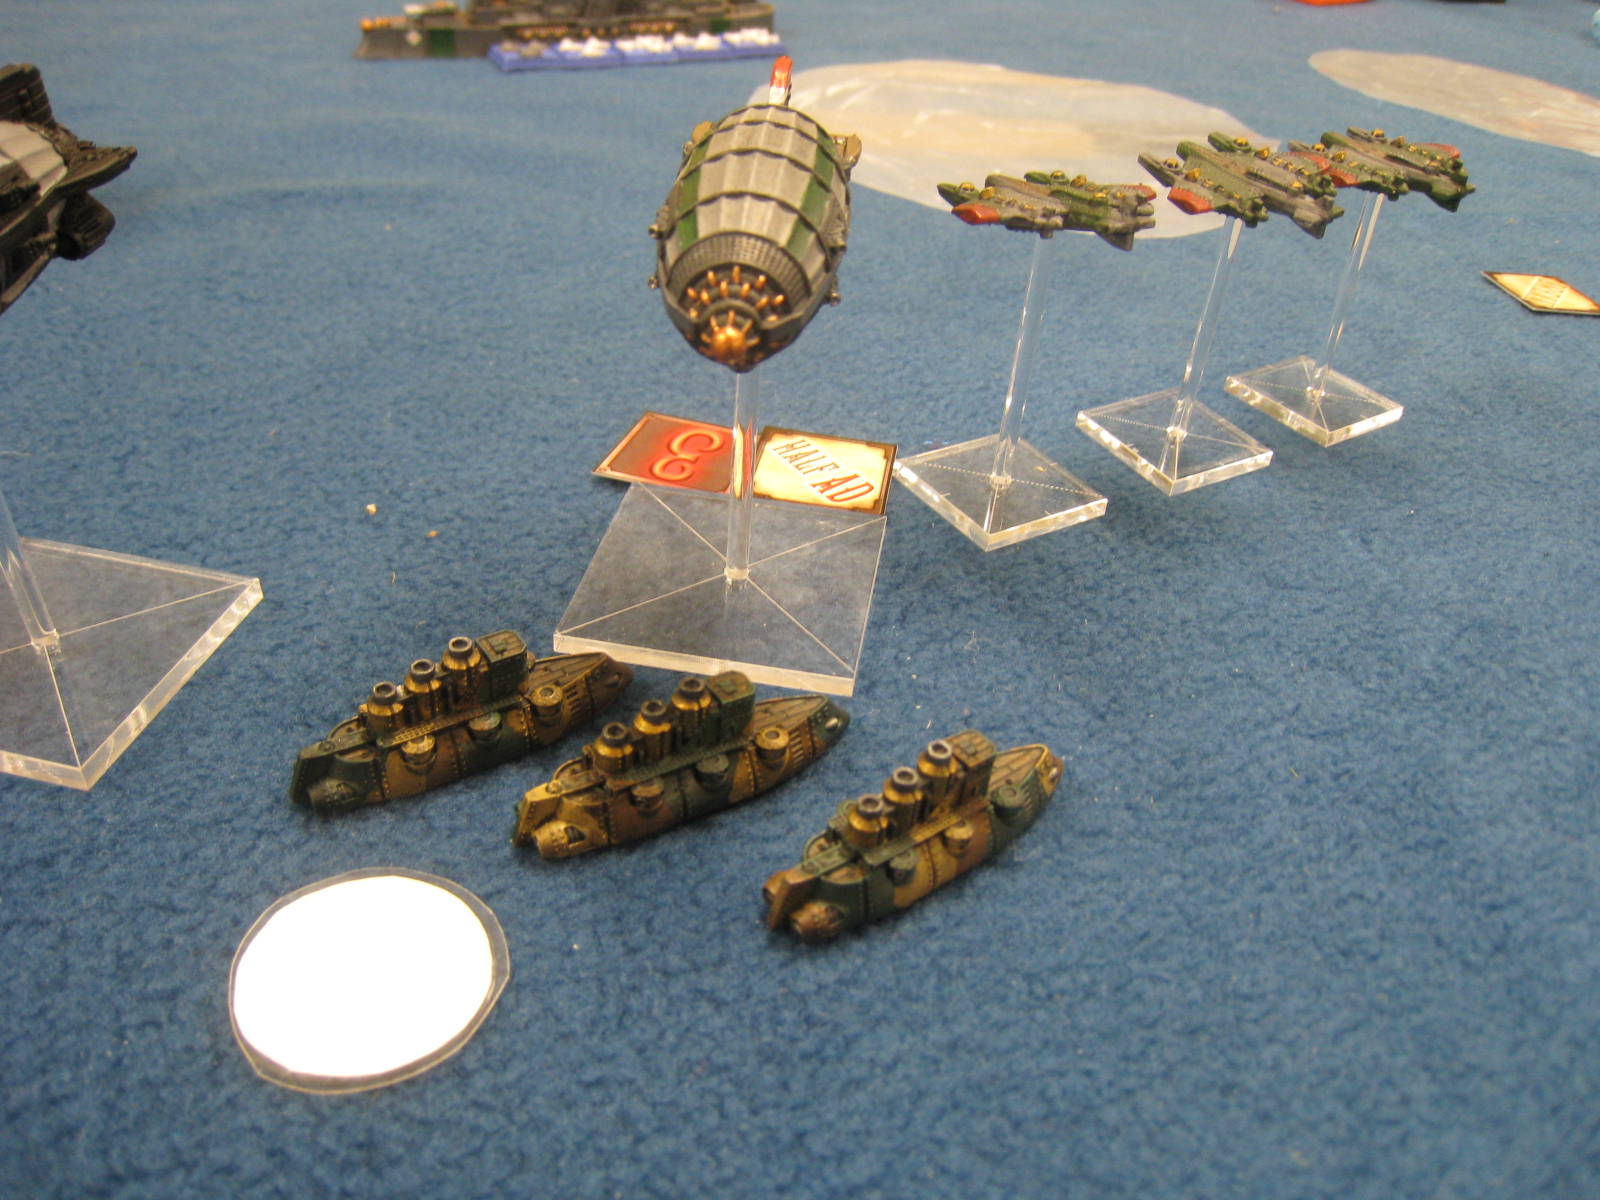
The fleet arranged for battle!

The game went pretty well for the French, I engaged in a massive flanking maneuver over an island with my flying vessels, while the rest of my fleet tried to keep his busy. A few good rolls, and I was ahead through kills. The Cruiser's Retardant Armour was doing a stellar job in keeping them alive, while they kept the Antarcticans focused onto them, rather than onto my flanking Battleship!


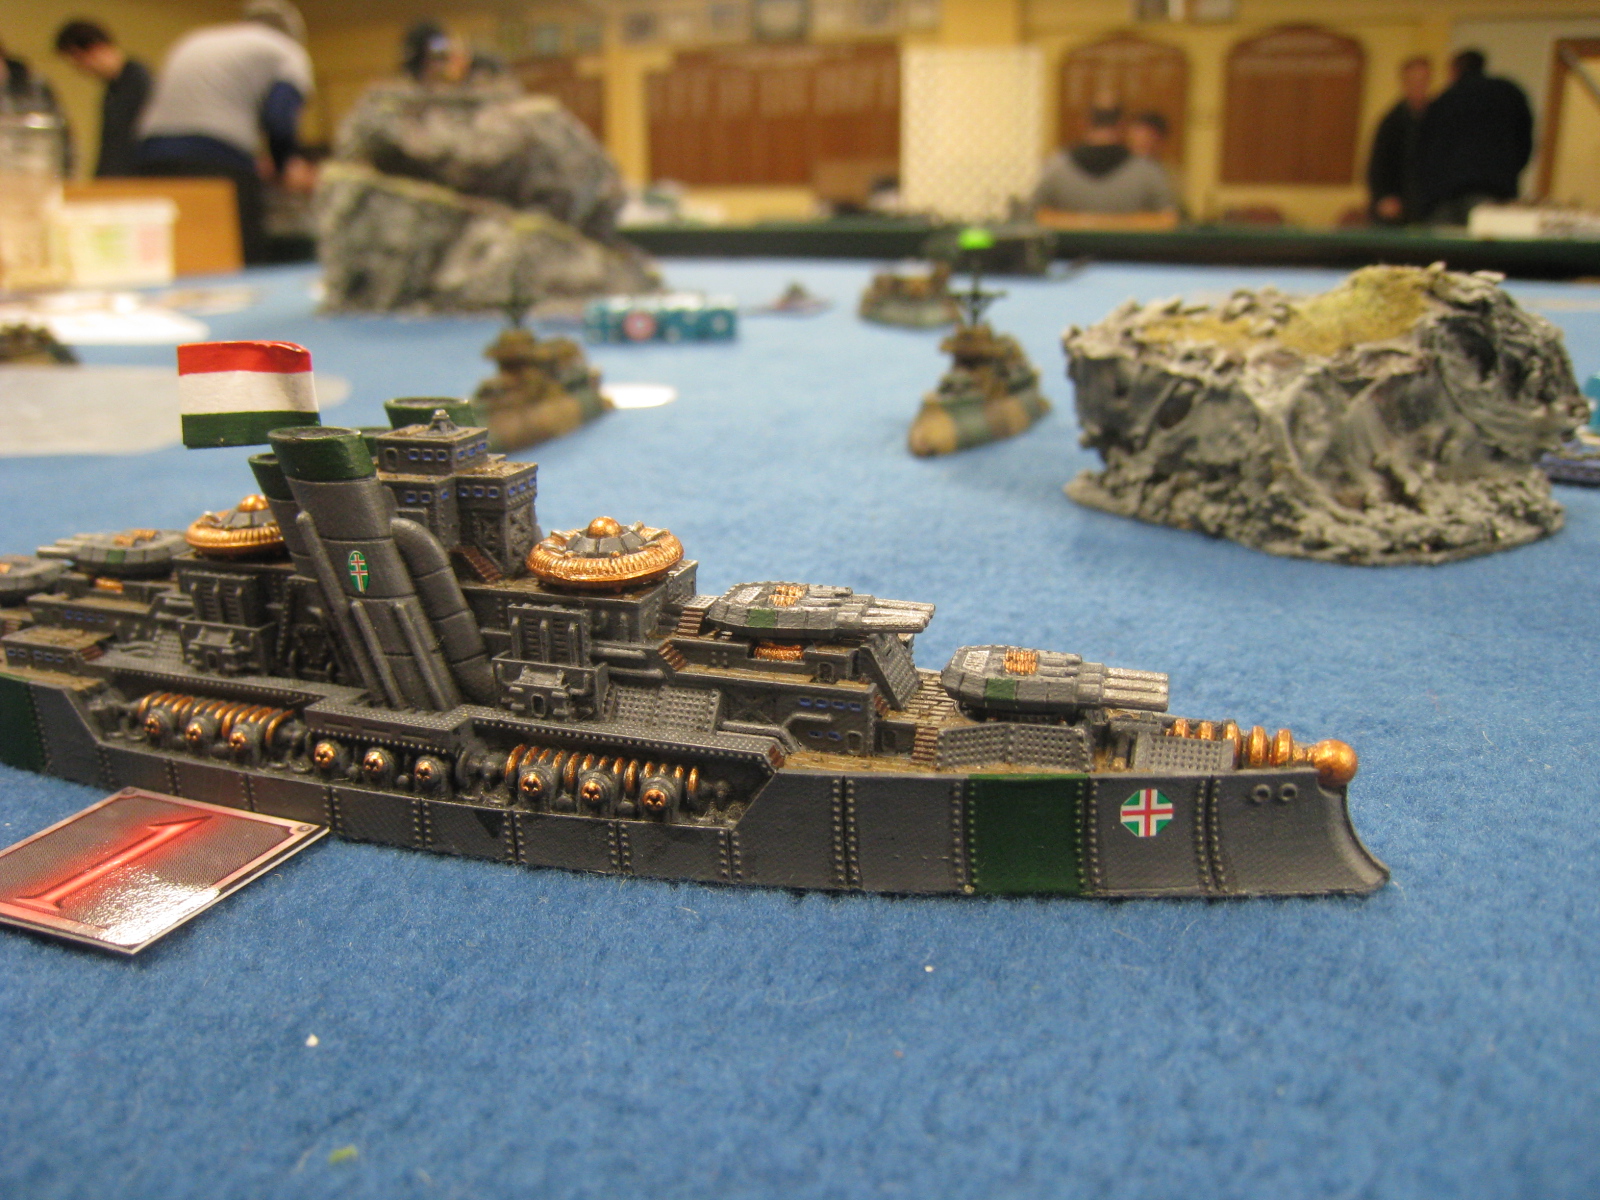
The Antarctican Battleship, lurking under the waves, comes to grief on the reef, taking it down to one last Damage point, only to be boarded from the stern by the Magenta battleship!

One Battleship prized, 800 victory points earned! So a glorious game first up, Vive le France! The Antarcticans are a troublesome fleet, and if I didn't have to play them again, I would be a happy person. Lots of guns, and if they roll well, lots of very good shields!

But, there was no time to gloat about the successes, it was straight into Game Two.

Game Two against Ian and his FSA


Ian had taken a pretty cool FSA list- no shields but a whole load of Rockets! Luckily the French are pretty good at shooting those down, but it was a real concern! The mission was claiming table quarters, but Ian and I both knew that the fastest way to capture a table quarter was to destroy each other!

One one flank, we each put a squadron of frigates and a tiny token squadron, the other was our air power. In the middle, his fleet sailed side on (to maximise firepower) and mine sailed straight ahead (charge!)


Contact was made first in the centre of the map, the FSA cruisers steaming forward, attempting to cause damage onto the French Cruisers. Again, the Retardant Armour saved the day, and my return firepower was super effective! One squadron of cruisers was no longer bothering anyone...

On the left flank, the two Voltaire interceptors and a squadron of 3 Frigates were trying to take down three Lee Scoutships. A good first strike saw one blimp go down (I rolled really well with the Voltaires this game...) But the return fire was seriously damaging!


On the other flank, the frigates and tiny tokens dueled for the entire game, until only the one Frigate remained, and it was French!

Despite killing the Cruisers in the center, the enemy Battleship was more elusive, and was throwing out some serious damage to my fleet. I was unfortunately unable to sink the enemy Battleship by the end of the game. The last act of the game was a very damaged Voltaire interceptor was endeavoring to finish off the last Lee Scout ship, rolling 4 dice and getting 9 hits! Oh how fun the exploding dice mechanic is!


With only the enemy Battleship and one destroyer (who I just couldn't kill!) left on table, the French were in control of two table quarters, and contesting another. This meant another win to France! Vive le France!

Game Three against Bruce, with Brittanians

Bruce's Blog can be found here

This table came equipped with two bunkers, opposite each other in a nice narrow channel. The goal then? Not to lose your fleet!


This game went to show how it is good for your rules if you do go to a tournament, I know I get confused with rules sometimes, and Bruce and I had a few things we needed to work through! Not that there were arguments or anything, more that there were those moments of "Really? That's the rule?" on both of our parts. Which when it was the third game of Day One, we were probably both a bit too tired for!

At any rate, we only managed to get through 3 turns but I have no doubt that after more time, Bruce would have annihilated my entire fleet! It would be oh so easy to blame his dice (which to be fair were good), the fleet match up (French don't like torpedoes), but really, his few things he tried really worked!

Hawks with bombs zipped out, dropping them onto Cruisers and did crippling damage, then they turned and did more damage to the Battleship!

But the real kicker, was my Battleship losing no less than 5 Hull Points from getting hit by a Chainsaw Submarine! How does one of those even hit a skimming ship? Did it leap out "Free Willy" style?

At any rate, we both killed a fair bit of each other's stuff, but I am claiming the moral victory of the draw, because I was 5 points ahead!

So ended Day One, with two wins and one draw, apparently I was in the lead. More mocking ensued overnight about not playing a historical game, as well as a top notch dinner with a good group of people.

Day Two began auspiciously, in that it rained. Was this the turning of the tide of French fortunes? Or was I just being superstitious?

Game Four was against Jeremy with Brittanians (not again!)

The scenario on this table was to get ships near to the central point in the table, where they would score victory points. The only catch? The island was armed to the teeth with guns!

So, I planned to get as much stuff within 4" of the island, claim as many points and do as much damage as I could before the game ended (quickly), not wanting to repeat the previous near trouncing by the KoB!

The cruisers activated first to obliterate the nearby small bunker with turrets and broadsides (a LOT of hits), the smaller ships rolled forward and began bombarding the central island. Some good rolling meant damage points started appearing quickly on the bunker, my plan appeared to be working!

That was until the enemy destroyers zipped out and turned one cruiser into a burning hulk, that wasn't in the plan!

My counter fire from the Battleship and Voltaires was directed at the enemy Cruisers, as well as the Destroyers.

The Bunker in the centre fired, obliterating a frigate, but leaving everything else unscathed.

The next turn, I made sure to quickly finish off the Destroyers (I don't like facing them, so many dice of attacks!) and to keep my firepower directed at the enemy Cruisers. I lost half HP on the remaining two cruisers, but the key was that I was in control of the island, causing a victory in my favour!

The best thing for me was using my frigates to capture the bunker in the middle of the island. It had no benefit, but it was cool!

It was a very enjoyable game, and I get the feeling that had it kept going on for another turn or two, we would have simply annihilated each other, until there was nothing left!

So, 3 wins, one draw. On to game five! Vive le France!

Game Five against Nick with his Covenant.

Darn! Covenant again! I was hoping to avoid this fleet, because of a wave lurking Battleship and lots of destroyers, I was not confident at all of victory!

The mission was simple, pick up some tiny boats with valuable scouts on board, while also not letting the HMS Ocean smack into a nearby iceberg....


The game went pretty well for me, both Nick and my inability to roll a 4+ to pick up a coast watcher was highly comical, and led us to both believe that we might be able to sneak off with one of our opponents ones! It was not to be (because I couldn't roll a 4+)

The real fighting was all about the HMS Ocean. This ship had developed a reputation for not liking being boarded!

And it sure did live up to that reputation! First the Voltaires attempted to board, losing 4 AP to AA fire (from 4 dice, sigh), then they only killed ONE of the enemy AP (there is 3). Next, the Cruisers had a go, losing yet more AP, and not killing the enemy!

It was only when I used the die hard Epaulard submarine crew (with no AA fire!) that I was able to capture the Ocean. But the ordeal wasn't over, those 3 crew then had to fight off 7 boarders from the Antarctican Battleship that had just surfaced! So, AA kills 4 (from 4 dice again), then the Die Hard crew kill the remaining 3 for no losses!

We worked it out at around 18 AP points that the Ocean killed in our game alone, it had claimed all of the AP from a KoB carrier earlier, as well as having destroyed a Vanguard Submarine that rammed it!

Not a boat you want to mess with...

But back to the game, I had a 4+ dice roll to pick up the last coast watcher, which I failed. Which left the game at a draw!

So, 3 wins, 2 draws. Which was enough to leave me in First Place along with Jeremy (of game 4 fame). It was a most enjoyable weekend, I really liked the opportunity to play 5 games of Dystopian Wars in a row, without getting distracted by other games!

And a few more random pics from the weekend.


Now there is talk of Dystopian Wars at TAGcon later this year, so if you are keen, do come along for some sweet steampunky type action!

One of my favourite parts of tournaments has to be the swag that I bought over the weekend...


So many thanks to all involved, organisers, players, umpires, Hobby Hub, Richard for letting me stay. It all added up to a very good weekend!

Back to painting, tomorrow a "How to" guide for my French fleet I think...

CP